
Cloud services a very convenient and flexible way to use all sorts of IT infrastructure and services without buying them outright or paying for them 24-7 when they’re not being used. With that convenience also comes the problems with the flexible billing under the commonly used Pay-As-You-Go style plan. You never want to wake up to some insane bill after some VM scale set spun up 1000 instances overnight. You only need to google around to hear the horror stories of startups that collapsed due to running up massive cloud bills while everyone was asleep.
Azure, like many of the big cloud players, doesn’t allow you to set a monthly spend cap under a normal PAYG subscription, even after so many reported cases of accidental resource usage. There are plenty of tools available to help monitor and act on your costs and I’ll go through the ones I use daily to make sure I don’t suffer from bill shock. I’ll also cover other cost saving options to get the best bang for your buck out of Azure.
These suggestions are based on a PAYG subscription and would only suit an individual or small business however I’ll mention areas and guidance suited for larger organisations available in Azure.
PreReqs – Azure account, Owner or Contributor role on the target Azure subscription
Cost management + Billing
This is my go-to area in the Azure portal to monitor costs over just the ‘Cost Management’ area as I have control over the billing account and it has a helpful billing summary landing screen and access to everything related to both cost and billing. Cost management is available as a separate area so all users at lower levels (say resource group) can see and respond to their costs. The key areas in Cost management + Billing you would want to focus on for monitoring and responding to costs are budgets, alerts, cost analysis, cost advisor and anomaly detection. Let’s start with creating budgets but before we do…..
Grab the calculator
Before jumping into setting up a budget you would likely want to get an idea of what that budget amount should be. Creating budgets in cost management will show existing costs from prior months to help guide your decision. If you don’t have that history, for most general cases the go-to calculator is the Azure pricing calculator which allows you to create and save estimates, export and share them. Estimates can be composed of several resources to represent a project or workload.
If you need a VM or are migrating a VM to Azure try the VM selector to give you recommendations of VM size and a cost calculation. Cosmos DB also has a specialised capacity calculator. There’s also the Azure Migrate assessment tools to analyse your existing VMs or servers and recommend best-fit Azure resources and their costs.
In cases of migrating from on-prem/another cloud to Azure there is the TCO Calculator, Hybrid Benefit calculator (if you have existing Windows, Linux or SQL Server licences).
Create a Budget, Alert and Action Group
In the Azure portal, navigate to ‘Cost Management + Billing’, if you only have access to ‘Cost Management’ you can still do the tasks below. Go to ‘Cost Management’ -> ‘Budgets’. On the budgets screen, as pictured you can set your scope for your budget from several billing-based scopes (Billing account, billing profile, invoice section) above the normal management hierarchy.

For my own Azure subscription, I set my budgets at the subscription level so I can view all my budgets in one place including budgets on resource groups as well as the whole subscription. Another reason is there is no way to set the currency other than USD on the top-level ‘billing account’ scope budgets even though I created and am billed in AUD. Furthermore, in the Azure app, only budgets on subscriptions or resource groups are possible to see. For larger organisations, you would normally have billing and budgets divided up into a more complex structure, eg. separate subscriptions, management groups, billing profiles, etc. If you are starting out in Azure and need to set organise a complex structure the Cloud Adoption Framework has a helpful guide.
Ok let’s get started creating the budget, if your scope is not set to your subscription, click on the Scope button and navigating through the root management group section and click Select this subscription as pictured

Now click the + Add button to create your budget.
You can select a filter here from many different dimensions such as tags or resource types. I tend to have one budget for the whole subscription (eg no filter) and then create other budgets with a filter on a resource groups I want to ‘cap out’ the cost of.
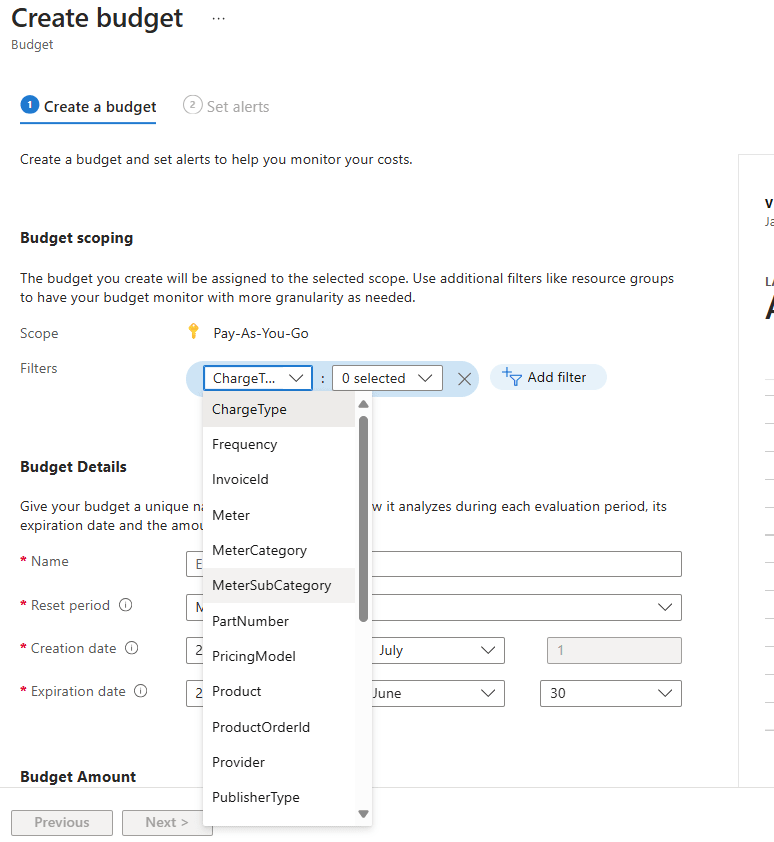
Give your budget a name and leave your budget at monthly and set a limit at what you expect or hope to keep your costs at then click Next. The graph on the right-hand side gives useful information to base this price decision on.
Now we can setup what threshold we wish to be alerted as projected or actual, I usually go for 90% of actual. You can set the email lower down to be notified from but I find it better to also set an action group as you can manage it separately to your budget and trigger actions. click the Manage Action Groups link then Create.

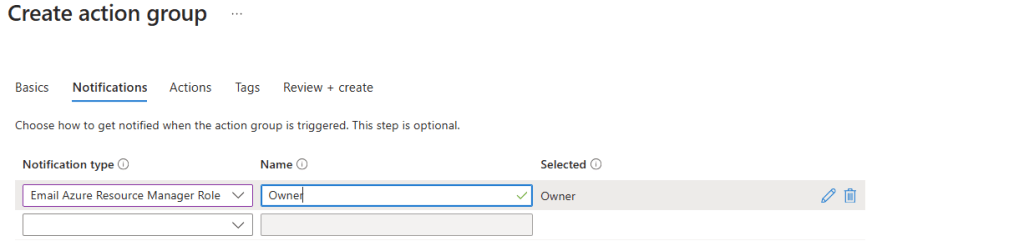
Setup a new resource group for all your administration resources like action groups if you don’t have one. Give your action group a name that reflects its usage (one I have is for ‘All admins notifications’) and hit Next: Notifications.

You can add notifications to the roles assigned to the subscription or email/SMS/azure app push or voice. Select which one you’d prefer or multiple and hit next. I usually set one ‘Email Azure resource manager role’ type to the subscription owner and a push notification to my email on the Azure app. Enter in your notification of choice and click Next: Actions
The actions of an action group are quite powerful, and their application is far-reaching as they can be triggered from other sources than a budget. As pictured below there are quite a few types. As one example, due to there being no spend cap in Azure, I have an action of an Automation runbook to shutdown resources in a resource group once it hits a budget to prevent any unexpected bill for the month. A real-world example may be setting a budget for a dev or testing subscription/management group/resource group and have it shutdown or destroy the dev/test VMs if the monthly spend is hit. Skip this for now and click Review + create then Create.

Now that is done you can hit the Create budget link in the breadcrumb to get back to your new budget. Select your action group and enter an email you’d like to get notified on then click Create
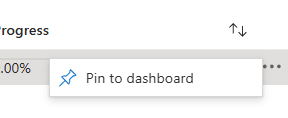
You can now see your budget in the list view and the progress to its limit.

Track your costs on dashboards
Dashboards are what I use daily to monitor both my subscription and production resource group costs. On your new budget as pictured above, click the ellipsis on the far right and hit Pin to dashboard.
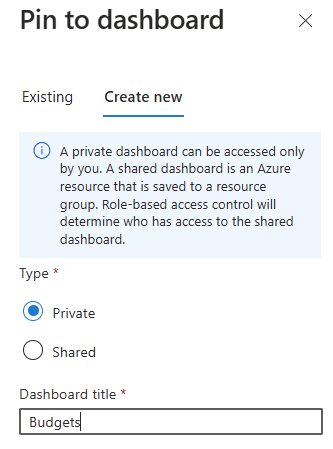
Select the Create New tab and leave type as Private and enter a name (eg Budgets) then Create and pin.
Now hit the Microsoft Azure logo in the top left and select your dashboard from the dropdown if you have others an you should see you budget spend here.

There are also some other handy tools I use to monitor my costs daily that you can add to your dashboard from the cost analysis area.
Cost Analysis
Navigate back to ‘Cost Management + Billing’, and select ‘Cost Analysis’ in the left pane. Set your scope as a subscription again and you’ll get a helpful breakdown of your current and projected costs for the month. Click on the pin and add this to your existing budgets dashboard.
Another very helpful screen is the daily costs to see if you have any sudden changes in daily spending. Go back to the same Cost analysis screen with your subscription scope and change the ‘View’ dropdown to Daily costs and on the far right set Group by none as pictured. Pin this one as well.


Back again to the same Cost analysis screen with your subscription scope set, change the ‘Cost by resource’ dropdown to Resource groups as pictured. This will give you a helpful breakdown of the accumulated actual costs of each resource group. Pin this one to your dashboard.

These are the key views I find handy to get an overview daily on my costs. There are plenty of other views you can compose as you see fit such as adding a filter to a resource group and pinning that to a dashboard to perhaps monitor the costs of a production application you have. Another helpful one would be setting the cost by resource to services to see what you are spending on particular services over the month.
Anomaly detection
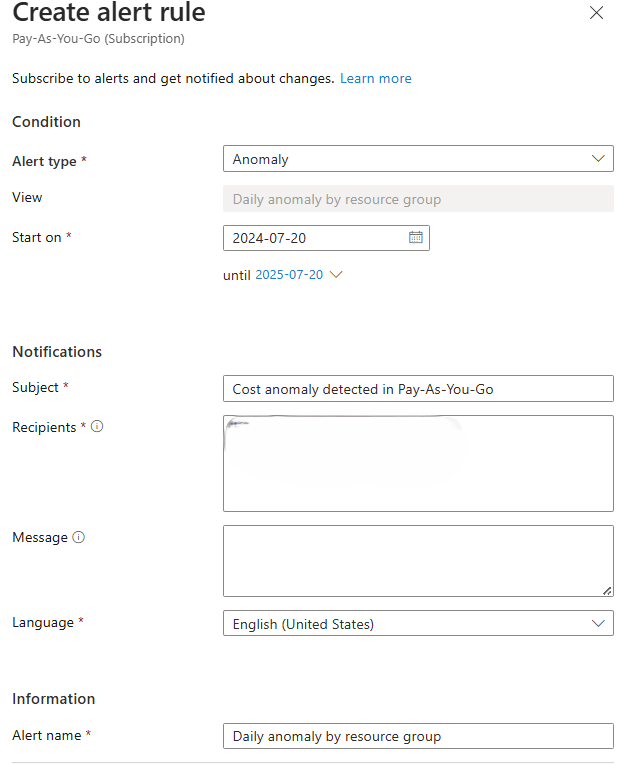
Another helpful alert to have setup on your subscription is anomaly detection. I’d like to know if my production server is getting hit with higher than normal traffic and if the costs have suddenly spiked. To set it up. go to the Cost Alerts area and press the + Add button. Select Anomaly as the type as pictured and hit save.

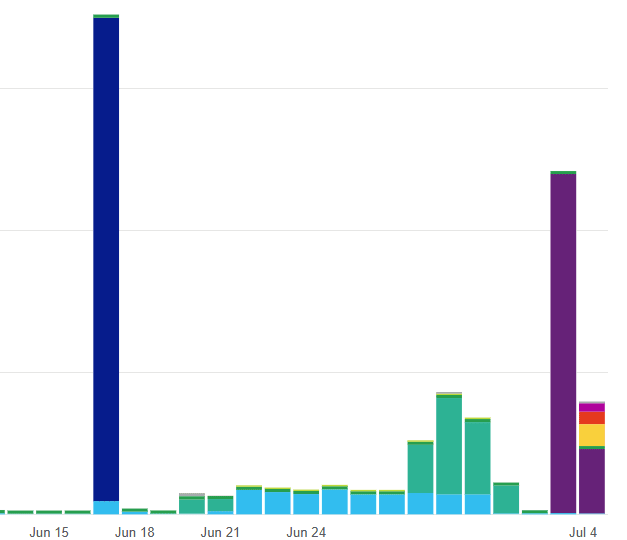
You can manage/delete this by going to the alert rules area. You can also view any anomaly information by going to Cost Analysis, setting the scope at a subscription level, leave the view as Accumulated costs and set the view by Resource groups as pictured. You will see an insights row you can click on See insights and drill into an insight as pictured to give you details on anomalies.


Cost advisor
If you navigate in the portal to ‘Cost Management > Advisor Recommendations’ Azure Advisor will show any recommendations related to your resources and their usage. There’s also a link to their set of recommendation rules on this page. This is just part of the Advisor which covers all 5 pillars of the Microsoft Well Architected Framework and gives recommendations based on these as pictured.

Cost-saving offers
Azure has several offers available to reduce your spend, several of these can be found in the Cost Management -> Product + Services area of the portal.
With the Azure Hybrid Benefit, you can use an existing Windows or Linux licence with a VM or Microsoft SQL Server to reduce costs (as licencing is factored into hourly rates)
Azure Spot Pricing gives discounts of up to 90% for VMs that can take advantage of unutilised capacity in Azure. The catch is your VM will be evicted if Azure needs that capacity so it’s best suited to non-critical or batch-processing workloads that can tolerate interruption. Eviction can be set as either VM deallocate (stop) or delete.
Azure Savings Plans let you commit to spending a fixed hourly amount on compute services for one or three years to lower their cost. This covers quite a few compute resources than just VMs
Azure Reservations give you up to 72% savings for long-duration (1 or 3-year) resource reservations at fixed price. A scenario would be a VM that you have running 24-7, 365. Being billed at the hourly compute rate is much higher. There are quite a few different resources than just VMs to reserve
As the name suggests Azure Dev/Test is suited for non-production use of devs and testers. It is provided under a separate dev/test subscription and gives Visual Studio subscribers (USD$45/mo for individuals) special pricing on VMs, Azure DevTest Labs, Azure SQL, App service, and more. There are some regional restrictions however.
Advanced tooling
There are plenty of powerful tools available in cost management suited for organisations needing advanced reporting, exports, integration, or automation. An example of these are export scheduling, SAP and Power BI integration, AWS cost report integration, and automation through APIs.
Summary
I hope this post has helped you get a better view of your Azure costs and how to get notified before expenses get out of control. If you have any feedback or issues with the steps above please leave a comment.
Useful resources
MSLearn – Cost Management + Billing
MSLearn – Advisor cost recommendations
MSLearn – Cost anomaly analysis
MSLearn – Optimise your resources on cost recommendations
MSLearn – Azure assessments for resources